

Accurate fuel readings matter—I’ve been stuck before because I didn’t catch a bad gauge in time. A lot of people ask me how to test a fuel gauge with a multimeter. I use my Fluke 117 for this, but before testing, it’s crucial to understand the multimeter symbols. Knowing what each one means makes the process way easier and safer.
Quick Fix
First, locate the fuel gauge and sending unit in your vehicle. Then, prepare the multimeter for the appropriate resistance measurement setting. Test the continuity of the gauge’s wiring and check for any loose connections. Next, measure the resistance of the sending unit and compare it to the manufacturer’s specifications. If the readings are outside the acceptable range, there may be an issue with the sending unit.
A Quick Look
In this article, I’m going to walk you through how I test a fuel gauge using my Fluke 117 Electricians True RMS Multimeter. I’ll also share some of the common issues I’ve run into after testing. But before I get into the hands-on stuff, I want to quickly break down how fuel gauges work and why understanding their basics is so important.

NOCO Boost Plus GB40
⭐ 4.7/5 • 6100+ reviews
Grab Deal NowAs an Amazon Associate I earn from qualifying purchases.
Understanding Fuel Gauges

Fuel gauges play a crucial role in helping us monitor the amount of fuel in our vehicles. Let’s look at how they work and the components involved.
The Functionality of a Fuel Gauge

When you glance at your vehicle’s fuel gauge, you expect it to provide accurate information about the fuel level in the tank. The gauge operates based on signals from the sending unit connected to the fuel tank.
As the fuel level changes, the sending unit sends corresponding signals to the gauge, indicating the quantity.
Components of a Fuel Gauge System
The fuel gauge system consists of two primary components: the sending unit and the gauge itself. The sending unit, typically inside the fuel tank, measures the fuel level and sends electrical signals to the gauge. The gauge interprets these signals and displays the fuel level on the dashboard.


Preparing for the Test
Before you test your fuel gauge, taking the necessary precautions and gathering the right tools is crucial. Let’s go through the steps to prepare for the test and ensure a safe and effective process.
Ensuring Safety First
Safety should always be our top priority when dealing with electrical components. Before starting the test, disconnect the power source and relevant fuses to avoid potential electrical mishaps. This step reduces the risk of electric shock and protects you and your vehicle.
Gathering the Tools
You’ll need a few essential tools to test the fuel gauge with a multimeter. Firstly, ensure you have a multimeter with the appropriate settings for measuring resistance and continuity.

Additionally, have a set of screwdrivers or wrenches to disconnect the necessary components during testing.

Learn How to test a fuel gauge with a multimeter? Just in 5 essay steps

Now that we’ve prepared ourselves, it’s time to delve into the step-by-step process of testing our fuel gauge using a Fluke 107 digital multimeter. By following these instructions, we can diagnose any potential issues and ensure our fuel gauge provides accurate readings.
Step#01 Locate the Fuel Gauge and Send Unit
Start by identifying the fuel gauge and the sending unit in your vehicle. The fuel gauge is usually located on the dashboard, while the sending unit is often inside the fuel tank. Consult your vehicle’s manual or quickly search to locate these components.
Step#02 Prepare the Multimeter for the Test

Set your multimeter to the appropriate settings for measuring resistance. Ensure that the multimeter is calibrated correctly and in good working condition. If necessary, refer to the multimeter’s user manual for guidance on selecting the proper settings.
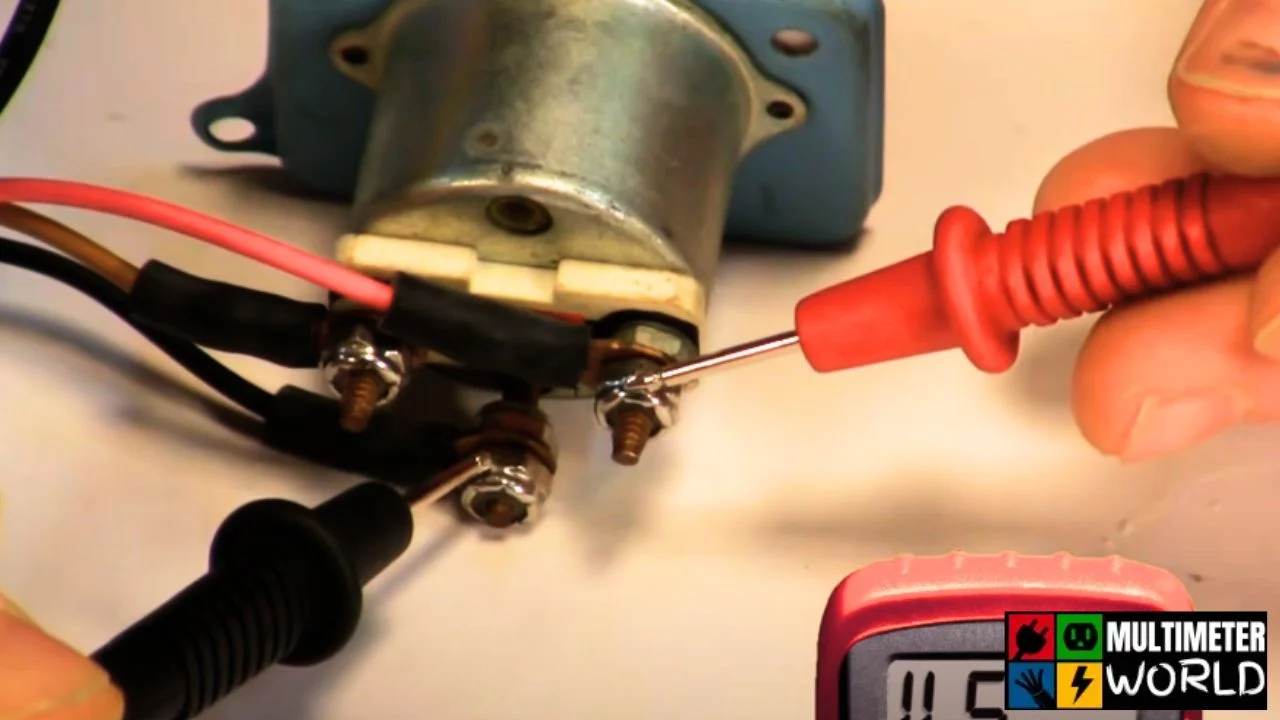
Step#03 Test the Continuity of the Gauge’s Wiring

With the multimeter ready, start by testing the continuity of the gauge’s wiring. This step helps identify any wiring issues affecting the fuel gauge’s functionality. Follow the wiring from the gauge to the sending unit and test for continuity using the multimeter’s probes.
Step#04 Test the Resistance of the Sending Unit
Next, measure the resistance of the sending unit. Disconnect the wiring connected to the sending unit and connect the multimeter probes to the appropriate terminals. The multimeter will display the resistance value, allowing us to compare it to the manufacturer’s specifications.
Step#05 Compare the Readings with the Specifications
Refer to your vehicle’s manual or the manufacturer’s specifications to determine the acceptable resistance range for the sending unit. Compare the readings obtained from the multimeter with these specifications. If the readings fall outside the excellent range, there may be an issue with the sending unit.

Common Problems with fuel gauge and their Solutions

After learning how to test a fuel gauge with a multimeter, now you think about its problems. Fuel gauges can encounter various issues that affect their accuracy and functionality. Let’s explore some common problems associated with fuel gauges and discuss potential solutions to address them effectively.
Inaccurate Readings
One of the most prevalent issues with fuel gauges is inaccurate readings. If you notice that your gauge consistently shows incorrect fuel levels, it can lead to inconvenience and potential fuel-related problems. To address this, check the wiring connections and ensure they are secure. The sending unit might require calibration or replacement if the wiring is OK.
Non-Functional Gauge
If your fuel gauge does not respond or remains stuck in one position, it indicates a non-functional gauge. Begin troubleshooting by checking the fuse related to the fuel gauge and replacing it if necessary.
Additionally, inspect the gauge for any physical damage or signs of wear. If the fuse and gauge are in good condition, the issue might lie with the sending unit or the gauge’s internal components.
Erratic Readings
Erratic readings, where the fuel gauge fluctuates randomly or behaves unpredictably, can be frustrating and unreliable. First, check the wiring connections and ensure they are secure and corrosion-free. If the wiring is intact, the issue may be due to a faulty sending unit that requires replacement or calibration.
Empty Tank Reading
If your fuel gauge consistently shows an empty tank even when you know there is fuel, it can cause concern. Check the wiring connections, as loose or damaged wires can lead to this problem.
Additionally, verify the fuel level using other methods, such as a dipstick or a trusted fuel consumption tracking system, to ensure the gauge’s accuracy.
Float or Sensor Issues
The float or sensor within the sending unit can sometimes become stuck or malfunction, leading to inaccurate readings. Removing and cleaning the sending unit may resolve the issue in such cases. If cleaning doesn’t work, replacing the sending unit might be necessary.
Troubleshoot and Fix Any Issues
If you’ve identified any issues with the fuel gauge or sending unit during the testing process, it’s time to troubleshoot and fix them. Consult a professional mechanic or refer to vehicle-specific forums and guides for troubleshooting steps and potential solutions.
How to maintain a fuel gauge?

Proper maintenance can go a long way in ensuring the accuracy and functionality of your fuel gauge. Let’s explore additional tips to keep your fuel gauge in optimal condition and avoid potential problems.
Regular Inspection and Cleaning
Periodically inspect your fuel tank and sending unit for any signs of debris, dirt, or corrosion. Clean them using appropriate cleaning solutions and tools to prevent obstruction or interference with the gauge’s readings. Regular cleaning helps maintain accurate fuel level measurements.
Track Fuel Consumption
Keep track of your fuel consumption by noting the mileage covered and the amount of fuel refilled. Compare this data with the readings on your fuel gauge to identify any discrepancies or inconsistencies. If you notice a significant deviation, it may indicate a potential issue with the fuel gauge that requires attention.
Calibrate the Fuel Gauge
Consider calibrating your fuel gauge system periodically. Calibration ensures that the gauge accurately reflects the actual fuel level in the tank. Consult your vehicle’s manual or seek professional assistance to calibrate the fuel gauge properly.
Avoid Overfilling the Tank

Overfilling the fuel tank can lead to damage to the sending unit or other components of the fuel gauge system. Follow the recommended fuel level guidelines provided by the manufacturer to prevent any potential issues caused by overfilling.
FAQs about how to test fuel gauge with a multimeter
How do I reset my fuel gauge?
Resetting a fuel gauge may vary depending on the specific vehicle and its fuel gauge system. However, a standard fuel gauge reset disconnects the vehicle’s battery for a few minutes and then reconnects it. This action can reset the electronic modules in the vehicle, including the fuel gauge.
Then, reconnect the negative terminal securely. After reconnecting the battery, start the vehicle and observe the fuel gauge. It should reset and display the current fuel level accurately. If the issue persists or if you need clarification on performing the reset yourself, it is recommended to consult the vehicle’s service manual or seek assistance from a professional mechanic.
Can a fuel gauge be repaired?
Yes, a fuel gauge can often be repaired depending on the issue. Common problems with fuel gauges include faulty wiring, a malfunctioning sender unit in the fuel tank, or a defective gauge itself. If you’re experiencing inaccurate readings or a non-functional fuel gauge, there are a few steps you can take. First, check the wiring connections and ensure they are secure and free from damage or corrosion. The sender unit may need attention if the wiring appears in good condition.
This unit is responsible for measuring the fuel level in the tank and sending the information to the gauge. It can sometimes become worn or faulty over time. In such cases, replacing the sender unit may resolve the issue. If the gauge itself is the problem, it may be repairable by a skilled technician or require a replacement. It’s essential to consult your vehicle’s service manual or seek professional assistance to accurately diagnose and repair the fuel gauge.
How many ohms should a fuel gauge read?
The ohm reading of a fuel gauge can vary depending on the specific vehicle and fuel gauge system. However, most fuel gauges operate within a typical range of 0 to 90 ohms or 240 to 33 ohms. The particular range for your vehicle can be found in the vehicle’s service manual or manufacturer’s instructions. The fuel gauge’s ohm range corresponds to the different fuel levels in the tank.
As the fuel level changes, the resistance of the fuel-sending unit connected to the gauge also varies, resulting in different ohm readings. To ensure accurate fuel level readings, it’s crucial to match the fuel gauge’s ohm range with the fuel tank’s sender unit during troubleshooting or replacement.
Can I test a fuel gauge without disconnecting it from the vehicle?
After knowing the complete procedure about how to test a fuel gauge with a multimeter, many people ask a common question about whether I can test without disconnecting it from the vehicle. Yes, it is possible to test a fuel gauge without disconnecting it from the vehicle, but it is generally recommended to disconnect the wiring or connectors for more accurate readings.
Testing a fuel gauge without disconnecting it may involve measuring the voltage directly at the fuel gauge terminals or using a wiring harness adapter specifically designed for testing purposes. However, keep in mind that testing without disconnecting the gauge may introduce additional variables that could affect the accuracy of the readings.
why should I test a fuel gauge with a multimeter?
Testing a fuel gauge with a multimeter is essential to ensure accurate readings and reliable performance. Over time, fuel gauges can develop inaccuracies or malfunctions, leading to misleading fuel level indications. Using a multimeter, you can measure the voltage or resistance across the fuel gauge’s terminals or wires, quantitatively assessing its functionality.
This testing process allows you to verify if the fuel gauge is operating within the expected range and responding correctly to changes in the fuel level. By identifying any issues or discrepancies early on, you can address them promptly, preventing potential fuel-related problems such as unexpected stalls or running out of fuel.
Final thoughts
Testing a fuel gauge with a multimeter is a simple and effective way to ensure accurate readings and maintain fuel level accuracy. By following a few steps, such as locating the fuel gauge and its corresponding wires, setting the multimeter to the appropriate settings, and carefully measuring the voltage, one can determine if the fuel gauge is functioning correctly.
This process helps identify any issues and enables timely repairs or replacements, ultimately saving time and preventing potential inconveniences on the road.