If you’re having trouble with your speakers, or just want to make sure they’re working properly, you can test them using a multimeter. In this guide, we’ll walk you through the process of how to test a speaker with a multimeter. We’ll show you how to measure resistance, voltage, and current in order to determine whether your speaker is functioning correctly. Let’s get started!
How to Choose a Multimeter for Speaker Testing
There are several different kinds of multimeters available on the market today. Each type has pros and cons, so choosing one depends largely on your needs, budget, and experience level. Here’s a list of some popular digital multimeters for speakers testing. If you want a detailed reviews about best multimeters for electronics work then you should visit it.
Best Selling Multimeters for DIY PROJECTS
FLUKE 117 Multimeter
Fluke is one of the most trusted brands in terms of quality and accuracy. You can do almost every electrical measurement with it precisely.
4.9 of 5 stars
Klein Tools MM700 Multimeter
Most of the people don’t want spend a lot of money but want an auto ranging multimeter. Klein’s capture the market for these budget friendly multimeters.
4.7 of 5 stars
INNOVA 3320 Digital Multimeter
Till now, it is the most budget friendly as well as multi-purpose digital multimeter. The best thing about Innova 3320 is its Pocket friendly size, so you can carry it anywhere.
4.5 of 5 stars
Tools required for testing a speaker with a multimeter
- Digital Multimeter with test leads
- Speaker wire
- Alligator clips
- Test speaker
- Insulated Gloves
Step by Step guide on how to test a speaker with a multimeter
Step One: Measure Resistance
The first thing you’ll want to do is measure the resistance of your speaker. To do this, turn on your multimeter and set it to the ohms function (Ω). Then plug one end of a test lead into the positive terminal of your multimeter and connect the other end to one side of your speaker.
Now, take the other test lead and connect it to the negative terminal of your multimeter. This will complete the circuit and allow you to measure the resistance of your speaker. The reading on your multimeter should now be displayed. Write this number down for later reference.
Step Two: Measure Voltage
You’ll want to measure the voltage of your speaker. To do this, turn on your multimeter and set it to the volts function (V). Then plug one end of a test lead into the positive terminal of your multimeter and connect the other end to one side of your speaker.
Now, take the other test lead and connect it to the negative terminal of your multimeter. This will complete the circuit and allow you to measure the voltage of your speaker.
Step Three: Measure Current
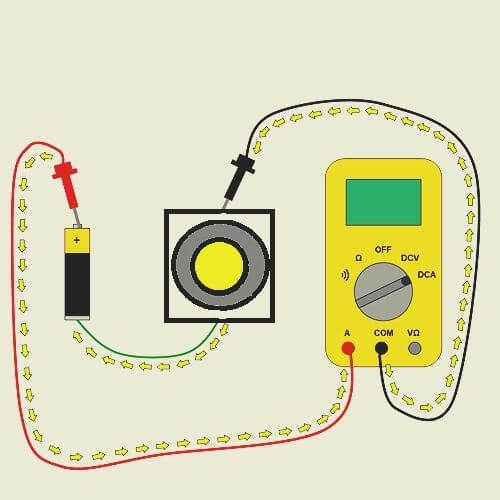
You’ll also want to measure the current of your speaker. To do this, turn on your multimeter and set it to the amps function (A). From here it is a bit different , you have to connect your speaker in series with speaker. Plug one end of the test lead into the positive terminal of your multimeter and connect the other end to one side of your power supply.

Now, take the other test lead and connect it to the negative terminal of your multimeter. This will complete the circuit and allow you to measure current of your speaker. You’ll also need a power supply that can provide at least twice as much voltage as required by your speakers in order for them work properly during testing. If you want to know more about how to measure amps with multimeter then I have also made a separate guide on that for you.
Step Four: Compare Results
Now that you’ve measured the resistance, voltage, and current of your speaker, it’s time to compare these readings with the manufacturer’s specifications. If your readings are within the acceptable range, then your speaker is functioning correctly. However, if any of your readings are outside of the acceptable range, then you may need to replace your speaker.
Safety guide while testing speakers with multimeter
When testing speakers with a multimeter, always be sure to take precautions to avoid electrical shock. Be sure to unplug your power supply before making any measurements, and never touch the probes of the multimeter while it is plugged in. Also, be careful not to short out your circuit by mistake. If you’re not familiar with how to use a multimeter, you may want to consult an electrician for assistance before attempting any testing on your own.
Conclusion of Testing a Speakers with a Multimeter
Now that you know how to test a speaker with a multimeter, you can rest assured knowing that your speakers are in good working order. If you ever have any doubts about the condition of your speakers, be sure to run a quick test to find out. And always remember to use caution when testing electrical equipment, as it can be dangerous if not done properly. If any of your readings are outside of the acceptable range, then you may need to replace your speaker.


