

If you own an electric bike, you know the battery is one of the essential components. Learning how to test an electric bike battery with a multimeter ensures it is functioning correctly and able to provide you with a reliable ride. To go a step further, it’s also helpful to know how to test the hub motor to keep your ride running smoothly.
| Quick Look: I make sure to regularly test my electric bike battery to keep it running smoothly. First, I check the voltage reading on the battery meter to see if it’s fully charged. Then, I test its maximum charge capacity using a load tester to ensure it’s holding the right power. I also inspect the battery for any corrosion around the terminals, cleaning it if necessary. These simple steps help me maintain the battery and extend its lifespan, ensuring a reliable ride every time. |
Quick Electric Bike Battery Testing Table


How To Test An Electric Bike Battery | Step By Step Procedure
Check the Voltage Reading on Your Battery Meter

The first thing you’ll want to do is check the voltage reading on your battery meter. This will tell you if your battery is fully charged or needs a recharge.
A Quick Look
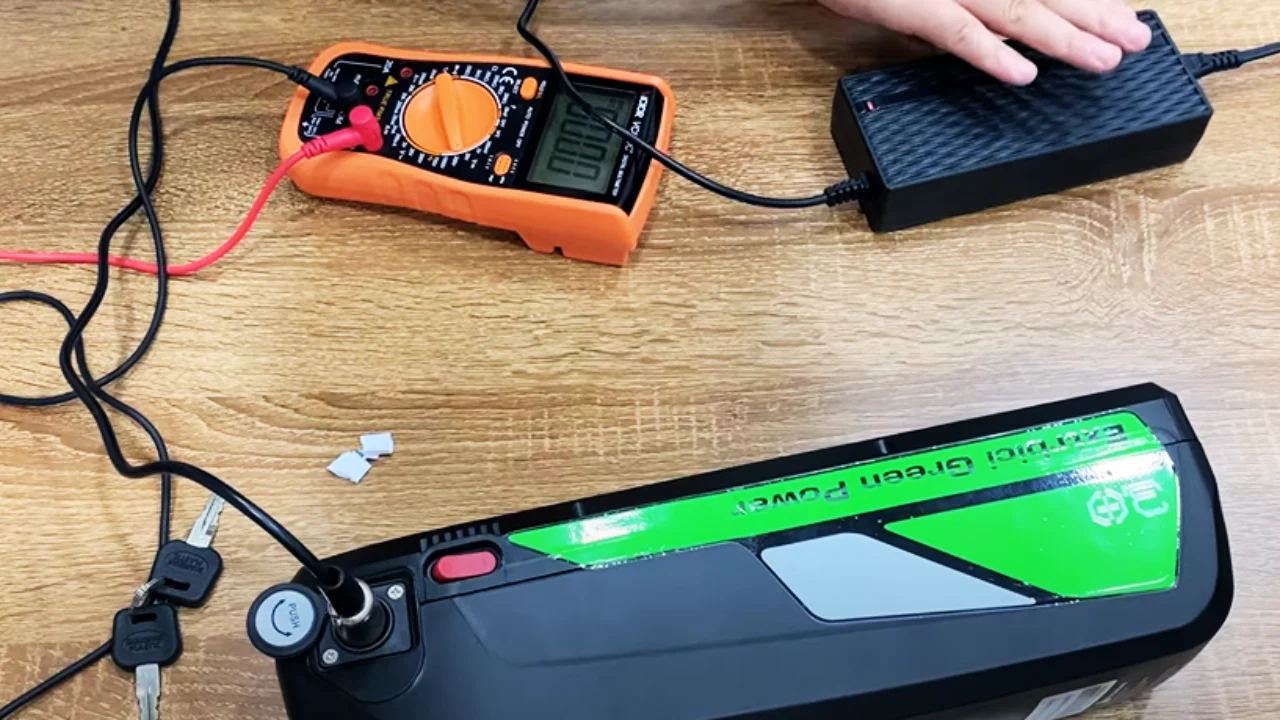
How to Test an Electric Bike Battery with a Multimeter starts by moving the meter’s dial to the voltage setting and then attaching the black probe wire to the negative terminal and the red probe wire to the positive terminal of your battery. If everything looks good, move on to step two.

NOCO Boost Plus GB40
⭐ 4.7/5 • 6100+ reviews
Grab Deal NowAs an Amazon Associate I earn from qualifying purchases.
Test Your Battery’s Maximum Charge Capacity

Now that you’ve checked your voltage reading, it’s time to test your battery’s maximum charge capacity. To do this, set up a load tester (which you can purchase online). Although, ensure it’s calibrated correctly for your particular type of battery pack. Using tools like a non-contact voltage tester beforehand can also help confirm there’s no live current where you don’t expect it.
Then connect each lead from the load tester directly to each port on your electric bike’s charger panel until they are securely fastened. Once connected, turn on the load tester and let it run until it reaches its total power output. After completing this process, a fully charged electric bike should have at least 12 volts. Furthermore, anything less than that means there may be an issue with the charger, individual cells in the pack, or even the regulator itself testing a voltage regulator with a multimeter can help rule out any faults in power management.
Check for Any Corrosion
Finally, check for any signs of corrosion around both terminals of your electric bike’s batteries. If any noticeable corrosion is present. Then, use a wire brush or sandpaper to clean off any debris before reattaching all leads and cables back into their respective ports. Doing so can help prevent further damage from occurring in future rides!


How Do You Know When Your Ebike Battery Needs To Be Replaced?

If you’re an e-bike owner, you know the battery is essential to your experience. While it can last several years with proper care and maintenance, all ebike batteries eventually need to be replaced. But how do you know when it’s time for a new one? Let’s take a closer look at some signs to watch out for.
Sign No 1: Lower Range
One of the first indicators that your battery needs to be replaced is when you start noticing a decrease in range. A good way to confirm this is to check the voltage with a multimeter, as it helps identify whether the battery is still holding an adequate charge. When your battery was brand-new, your e-bike may have been able to travel up to 30 miles on a single charge. But if the range has now been reduced to 10 or 15 miles, it may indicate that your battery is nearing the end of its life cycle.
Sign No 2: Longer Charging Times
Another sign is when charging times start getting more extended than usual. While both tools can help diagnose issues, understanding the difference between a multimeter and a voltage tester can ensure you’re using the right one for accurate readings. If you usually charge your battery overnight, but now it takes two or more days, this could also suggest it’s time for a replacement. This could also be caused by other factors such as age and environmental conditions (heat, humidity), so double-check before making any purchases.
Sign No 3: Overheating Issues
Finally, if you start noticing overheating issues while you’re riding, this could indicate that something isn’t right with your battery. Just like you’d check a hot water heater thermostat for consistent performance, inspecting your battery for irregularities is just as important. Overheating batteries is dangerous and can cause irreversible damage to other parts of the bike. If this frequently happens during rides, stop and inspect the battery as soon as possible it might be time for an upgrade!
What Is The Lifespan Of An Electric Bike Battery?

An electric bike battery has a decent lifespan, but it all depends on the kind you get. Generally, lithium-ion batteries can last up to 1000 full charge cycles and have a life expectancy of 3-5 years. If you’re looking for a reliable multimeter to check your battery’s health, the AstroAI M4KOR is a great tool to help with diagnostics.
For example, if you charge your electric bike battery every day for two years, you may need to purchase a new one even if there are still some charge cycles. That’s why it’s often wise to buy an extra battery or two in case one fails so that you can continue cycling without disruption.
Bottom Line:
So, how to test an electric bike battery? Testing an electric bike battery can be simple and easy. One of the most reliable ways is learning how to test an electric bike battery with a multimeter. As long as you follow these three steps, you’ll be able to easily keep tabs on its performance and make sure that it’s always performing at peak levels! Remember, regular maintenance like this can go a long way toward extending its lifespan and ensuring safe rides for years down the line. So what are you waiting for? Get out there and start testing!
FAQs
Q1. How often should I test my electric bike battery?
It’s a good idea to test your bike battery at least once every few months, especially if you ride frequently. Regular testing helps catch issues early and keeps performance consistent.
Q2. What voltage reading indicates a healthy e-bike battery?
A fully charged battery should show at least 12 volts. If the reading drops significantly below that, it may be a sign of cell damage or charging issues.
Q3. Can corrosion affect my battery’s performance?
Yes, corrosion on the battery terminals can disrupt the connection and reduce efficiency. To check for potential issues like parasitic battery drain, simply follow the steps in the parasitic battery drain guide. Cleaning the terminals with a wire brush or sandpaper can help maintain a solid connection.
Q4. How do I know if the battery charger is the problem?
If the battery isn’t reaching full charge despite multiple attempts, try testing the charger output with a multimeter. A faulty charger may show irregular or zero voltage output.