

How to test voltage using a multimeter? To test voltage using a multimeter, set it to the voltage setting and ensure it’s properly connected to the circuit. Place the probes correctly. Read the voltage value displayed on the multimeter’s screen.
Testing voltage using a multimeter is a fundamental skill for anyone working with electrical systems or troubleshooting electrical issues. This article will guide you through testing voltage using a multimeter, ensuring accurate measurements, and maintaining safety.
A Quick Look
The basic concept of voltage is important to understand before beginning the testing process. The potential difference between these two points in a circuit determines the voltage commonly measured in volts (V). The voltage indicates the force that pushes electrons throughout the circuit.

NOCO Boost Plus GB40
⭐ 4.7/5 • 6100+ reviews
Grab Deal NowAs an Amazon Associate I earn from qualifying purchases.
Selecting the Correct Range
The first step in testing voltage with a multimeter is to select the appropriate range. Multimeters typically have a range selector knob or button that allows you to choose the voltage range you want to measure. Selecting a range higher than the expected voltage is crucial to prevent overloading the meter. To check 240 voltage with a multimeter, ensure your multimeter is set correctly before proceeding.


Setting the Multimeter to the Voltage Measurement Mode
Once you have selected the appropriate range, set your multimeter to Test A Voltage Regulator With A Multimeter measurement mode. Depending on the model of your multimeter, this may involve turning a dial or pressing a button to switch to the voltage mode. Read the guide manual of your specific multimeter to understand how to switch to the voltage measurement mode.

Connecting the Multimeter
You must establish proper connections between the multimeter and the circuit to test voltage. Here are the steps to follow:

Power off the circuit
Before making any connections, ensure the circuit or device you are testing is powered off. This will prevent any potential accidents or damage to the multimeter. For more details on how to use a multimeter safely, visit multimeter to test voltage of live wires.

Select the appropriate probes
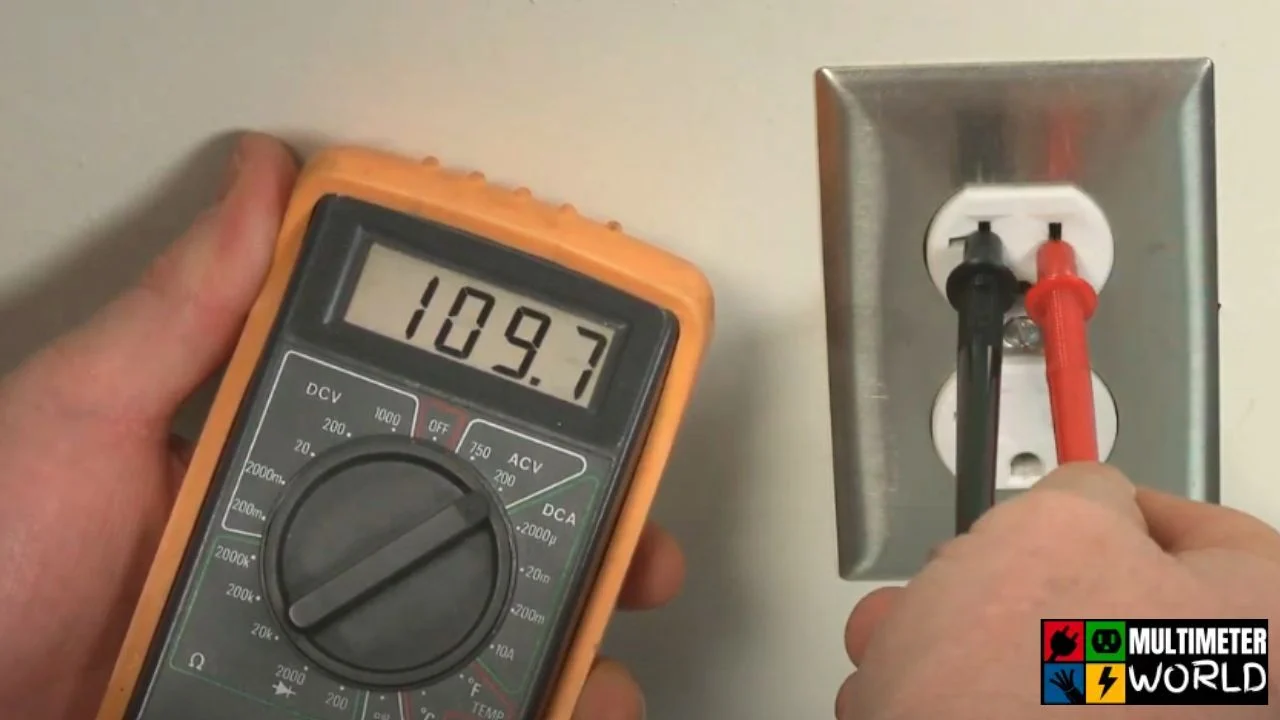
Most multimeters come with two probes—a red probe for positive connections and a black probe for negative connections. The red probe is typically used for voltage measurements.
Connect the probes
Connect the red probe to the multimeter’s voltage input jack, usually labeled “VΩmA.” The black side probe should be connected to the common input jack, typically labeled “COM.” Ensure that the probes are securely connected.

Reading the Voltage
Power on the circuit and observe the multimeter’s display. You should see a numerical value indicating the voltage if you have selected the correct range. For more information on how voltage testers work, check out voltage tester.

Keep an eye on the polarity, often represented by a positive or negative sign on the display. Positive voltage means the red probe has a higher potential than the black probe, while negative voltage indicates the opposite.

Safety Precautions
While testing voltage using a multimeter, it is crucial to prioritize safety. Here are a few measures to learn:
Use insulated probes
Ensure that the probes you use are insulated to prevent accidental electric shock. Inspect the probes for any signs of damage or exposed wires before use.
Check for live circuits
Always double-check if the circuit you are about to measure is live. Be cautious of any exposed wires or components still carrying voltage.
Avoid high-voltage measurements
A professional electrician or specialized equipment designed for high-voltage measurements should be consulted if you are uncertain about the voltage level or suspect high voltage.
Follow proper grounding procedures
When testing voltage in electrical systems, ensure you are properly grounded to avoid potential electrical hazards. Stand on a dry surface and avoid wearing jewelry or other conductive materials that can pose a risk.
Now you know how to test voltage using a multimeter.
Tips for testing 220v with a multimeter
Testing 220V electrical circuits with a multimeter is essential for anyone working with electricity. Here are valuable tips to help you test 220V with a multimeter:
Safety First
- Protect your hands with insulated gloves and safety glasses by wearing appropriate personal protective equipment (PPE).
- Ensure the multimeter you use is rated for the voltage you are testing. Most digital multimeters (DMMs) can handle up to 600V but double-check the specifications of your particular model.
- Disconnect the power supply to the circuit you are testing before performing any measurements.
Select the Correct Settings
Set the multimeter to the AC voltage (V~) mode. Some multimeters have separate AC and DC voltage settings, so ensure you choose the correct one.
If your multimeter has a range selector, set it to a voltage range higher than 220V. This will prevent potential damage to the meter if there are voltage spikes or fluctuations.
Test Point Selection
- Identify the points in the circuit where you want to test the voltage. These points are typically the live (hot) and neutral wires or the live wire and ground.
- If testing the live and neutral wires, ensure they are properly insulated and not exposed.
- If you are testing the live wire and ground, ensure that the ground connection is reliable and securely grounded.
Measurement Procedure
- Insert the multimeter probes into the appropriate ports.
- Touch the multimeter probes to the selected points. The red side probe should be connected to the live or positive wire, and the black probe should be connected to the neutral wire or ground.
- Be cautious not to touch the metal parts of the probes while taking the measurement. Hold them by the insulated portion.
- Read the voltage value on the multimeter display. If the voltage exceeds the range you set initially, switch to a higher range to obtain an accurate reading.
Interpretation and Analysis
- Check if the measured voltage matches the expected 220V. A small variation is normal due to fluctuations in the power supply.
- If the reading is significantly different from 220V or you suspect any circuit issues, consult a qualified electrician for further investigation.
- After completing the measurement, remove the probes carefully from the circuit.
It is always crucial to refer to the specific instructions and safety guidelines provided with your multimeter and consult a professional electrician when in doubt or dealing with complex electrical systems.


Tips for testing a 240V 3 phase
Testing a 240V 3-phase electrical system requires careful planning and attention to detail to ensure safety and accurate results. Here are some suggestions to help you through the process:
Review the system documentation
Before testing, familiarize yourself with the system’s specifications, including voltage ratings, current capacities, and any specific testing procedures recommended by the manufacturer or relevant standards.
Inspect the equipment
Inspect all components, including cables, connectors, switches, and protective devices. Look for signs of damage, loose connections, or abnormalities that could affect the test results or pose safety hazards. If you notice any problems, address them before proceeding with the testing.
Personal protective equipment (PPE)
Wear appropriate PPE to protect yourself from electrical hazards. This typically includes safety glasses, insulated gloves, and flame-resistant clothing. Ensure that your PPE is in good condition and properly rated for the voltage levels you will be working with.
Isolate the power supply
Before conducting any tests, disconnect the power supply to the system. You can do this by simply turning off the main circuit breaker or isolating the specific circuit being tested. Use lock-out/tag-out procedures to prevent accidental re-energization while working on the system.
Use appropriate equipment
High-quality multimeters, clamp meters, and insulation testers are commonly used for 3-phase system testing. Calibrate and verify the accuracy of the test equipment before starting the measurements.
Check the phase sequence
Confirm the correct phase sequence before energizing the system. Incorrect phase sequence can cause equipment damage or lead to measurement errors. Use a phase rotation tester or consult the system documentation to determine the correct order of the phases.
Measure voltage and current
Take careful measurements of the voltage and current levels throughout the system. Start by measuring the line-to-line voltage between each pair of phases and verify that it matches the rated voltage. Next, measure the current flowing through each phase and ensure it is within the system’s specifications.
Insulation resistance test
Perform insulation resistance testing to assess the insulation condition of the system. Use a properly calibrated insulation resistance tester to measure the resistance between the phase conductors and the ground. This test helps identify any insulation faults or weaknesses that may require attention.
Check for voltage imbalances
Measure the voltage levels between each phase and the neutral point (if applicable) to identify any voltage imbalances. Significant voltage imbalances can indicate faulty connections, unequal loads, or other issues impacting the system’s performance or safety.
Verify protection devices
Test the functionality of protection devices such as circuit breakers, fuses, and overload relays. Ensure they trip or open the circuit as expected when subjected to overload or fault conditions. Before re-engaging the system, troubleshoot and rectify any malfunctioning protection devices.
Document the test results
Record all measurements, observations, and any abnormalities encountered during testing. In addition to providing a reference line for future maintenance or troubleshooting activities, documenting the results will facilitate tracking the system’s performance over time.
Follow safety protocols
Always adhere to safety protocols and established electrical safety guidelines throughout the testing process. Keep a safe distance from live electrical components, avoid unnecessary contact with conductors, and work methodically to minimize the risk of accidents.
Post-test checks
After completing the tests, inspect the system again to ensure all connections are tight, covers are properly secured, and the system is safe. Remove any lock-out/tag-out devices and restore power only when you are confident that the system is ready for operation.
Remember, qualified professionals with adequate training and experience should ideally perform electrical testing.
FAQs
How do I check the voltage with a multimeter at home?
To check the voltage with a multimeter at home, follow these steps. Set the multimeter device to the appropriate voltage range, usually AC or DC, based on the type of circuit you’re measuring. Ensure the test leads are connected correctly to the multimeter.
Touch the black lead to the circuit’s ground or negative terminal and the red to the positive terminal. Read the voltage displayed on the multimeter’s screen, taking note of AC or DC and the numerical value.
How do you check wire voltage?
To check the voltage of a wire, you can use a multimeter. First, ensure that the wire is disconnected from any power source. Set your multimeter device to the appropriate voltage range, either AC or DC, based on the type of circuit you are testing.
Next, connect the multimeter’s black lead to the wire’s ground or negative terminal and the red lead to the positive terminal. Turn on the multimeter and observe the voltage reading on the display. Note whether the voltage is AC or DC and the numerical value.
How do I test my 240V power supply?
To test a 240V power supply, follow these steps with caution. Set your multimeter to the appropriate AC voltage range. Ensure all devices are disconnected and switched off. Connect the black probe to the ground slot of the power outlet and the red probe to either power slot.
Read the voltage displayed on the device (multimeter); it should read around 240V. If the voltage is significantly lower or higher, there might be an issue.
What is the voltage in a single phase?
In single-phase electrical systems, the voltage refers to the potential difference (PD) between two points in the main circuit. The standard voltage in most residential and commercial applications is 120 in North America and 230 in many other parts of the world.
However, the actual voltage can vary depending on the country and electrical grid standards. Single-phase power is commonly used for lighting, small appliances, and general electrical loads in homes, offices, and small businesses. It is important to note that in industrial settings, three-phase power is more commonly used for larger loads and machinery.
Conclusion
Testing voltage using a multimeter is essential for anyone involved in electrical work. Following these steps, you can accurately measure voltage and troubleshoot electrical issues confidently. Remember to select the correct range, set the multimeter to the voltage measurement mode, establish proper connections, and prioritize safety throughout the process.
With practice and experience, you will become proficient in using a multimeter to test voltage effectively. We hope now you know how to test voltage using a multimeter.