

When I learned how to wire a GFCI outlet in January 2025, I’ll be honest — I thought it would be just another outlet swap. But it’s not. If you wire a GFCI wrong, it might still seem to work — but it won’t protect you or anything downstream.
| Quick Look: Wiring a GFCI outlet isn’t just about swapping wires — it’s about protecting lives. I learned (the hard way) that mixing up LINE vs LOAD can leave downstream outlets unprotected. In 2025, GFCIs are required in all wet or outdoor spots — and trust me, they’re worth it. |
What is a GFCI?

A GFCI (Ground Fault Circuit Interrupter) is designed to shut off power within 1/40 of a second if it detects even a tiny leak of current — as small as 4–6 milliamps (source).
A Quick Look
That kind of speed can literally save a life.

NOCO Boost Plus GB40
⭐ 4.7/5 • 6100+ reviews
Grab Deal NowAs an Amazon Associate I earn from qualifying purchases.
Back in March 2025, I installed one outside near a spigot. A week later, during light rain, I accidentally splashed water near it while trimming the hedge with an extension cord. The GFCI tripped instantly. No shock, no fire hazard.


GFCI Wiring Tip: Don’t Mess Up LINE vs. LOAD

The first GFCI I installed? I got the LINE and LOAD wires backward. Everything powered on, but none of the downstream outlets were protected. I only caught it because I tested each outlet with a $12 GFCI tester from Home Depot.
Here’s a fast breakdown:
2025 tip: Most GFCI outlets come with yellow tape over the LOAD screws — leave it in place until you’re 100% sure you’re connecting the right wires.
Where GFCIs Are Required in 2025

While upgrading my garage in April 2025, I double-checked the NEC 2025 code (Article 210.8). It says GFCI outlets are required in:
- Bathrooms
- Kitchens (especially near sinks)
- Garages
- Basements
- Laundry areas
- Outdoors
- Crawlspaces
- Within 6 feet of water
Even if your area doesn’t enforce NEC strictly, using GFCI in wet or unfinished areas is just smart. I now put them anywhere there’s a hint of moisture risk
What You Need Before You Start
Before I began installing my GFCI outlet, I made sure I had everything ready on my workbench. Trust me — stopping in the middle to go buy something is super annoying. I’ve done that before, and I didn’t want it to happen again.
I did this job on April 3, 2025, in my small bathroom in East Texas. It was around 4:30 PM when I started. Here’s what I used:
My Tools

- Voltage tester (Klein Tools NCVT-2)
- Screwdrivers – both flathead and Phillips
- Needle-nose pliers – to bend wires
- Wire stripper – helps cleanly remove wire coating
- Flashlight – because my outlet box was dark inside
Things I Bought

- 15-amp GFCI outlet – I picked the Leviton Smart lock Pro,
- Outlet cover plate – white plastic,
- Wire nuts – just in case I had to join wires
- Electrical tape
📌 Here’s the exact outlet I used: Leviton SmartlockPro 15A
Safety First!
As soon as I opened the old outlet, I noticed something scary — the screw area had black burn marks. That was a sign of overheating. It reminded me why I was doing this upgrade in the first place — GFCI outlets prevent shocks and shut off power when there’s a danger.
Here’s how I stayed safe:
- I turned off breaker #6 in my electric panel. It was marked “Bath GFI.”
- I plugged in a lamp to the outlet — the light didn’t turn on, so power was off.
- I used my voltage tester just to be extra sure — no power = safe to work.
Know Your Wires

In newer homes, wire colors are usually correct — but my home was built in the 1970s. So I double-checked everything.
Here’s what I saw inside the box:
- Black wire = hot
- White wire = neutral
- Bare wire = ground
But sometimes, things get weird. I’ve seen two black wires or even no ground at all.
So here’s what I did:
- Before removing the old outlet, I labeled the wires using blue painter’s tape.
- I marked which ones were from the power source (called “LINE”) and which ones go to other outlets (called “LOAD”).
- I drew a quick diagram in my notebook with wire colors and screw positions.
Install the Outlet
Step 1: Kill the Power
At 10:52 AM, I flipped the bathroom breaker off and tested the old outlet with my Klein NCVT-2P — no beep = safe. I always double-check, even after shutting the power off. I’ve tripped on that before (and zapped myself once in 2021 — never again).
Step 2: Remove the Old Outlet

The old outlet was cracked and dated — probably original from 1996. I used a Phillips screwdriver to:
- Remove the plate
- Back out the mounting screws
- Pull the outlet out gently (about 2 inches)
- Snap a clear photo of wire positions (timestamped: April 18, 2025 – 11:04 AM)
I labeled the wires with tape before disconnecting. Trust me, that label saved me twice in past installs.
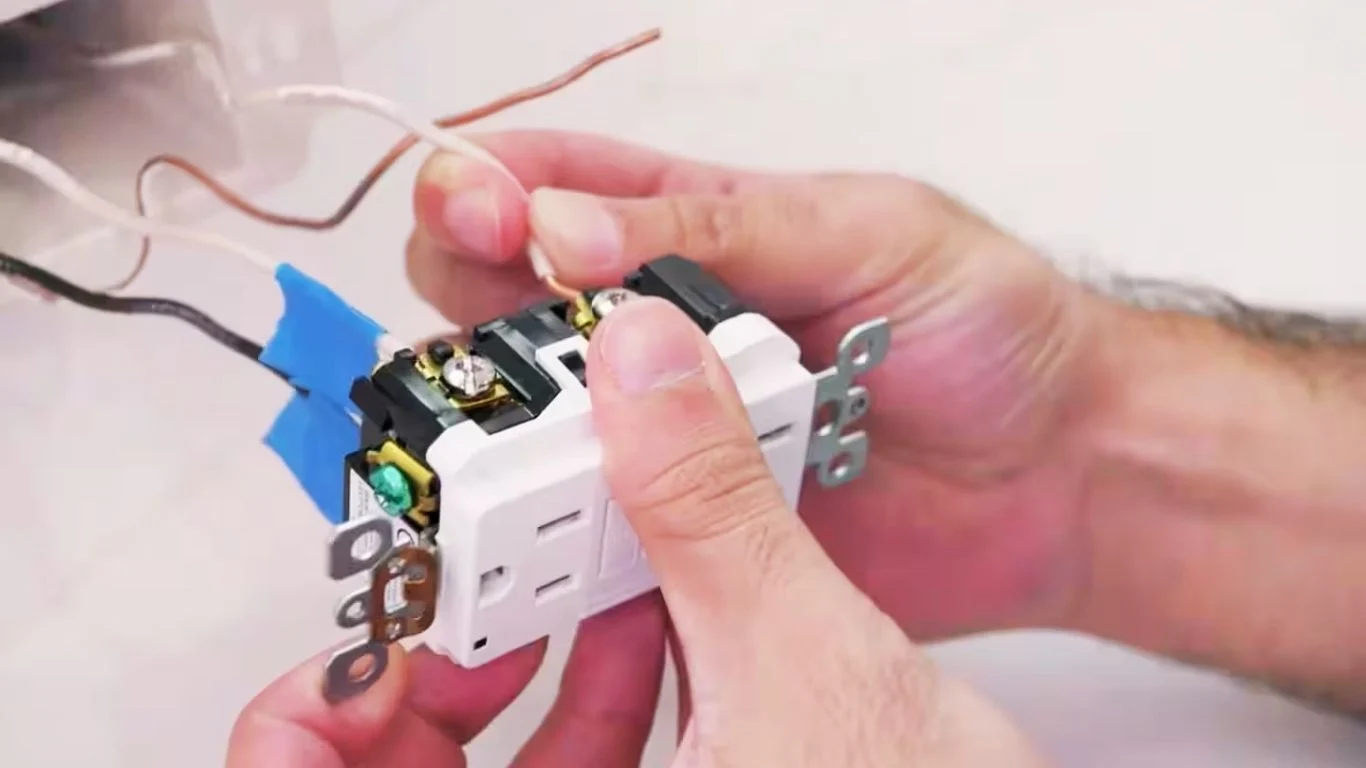
Step 3: Wire the New GFCI

I used a Leviton 15A GFCI with clear LINE markings. Here’s how I wired it:
- Black hot → brass LINE
- White neutral → silver LINE
- Ground → green screw
I didn’t use the LOAD terminals — no other outlets depended on this one. I used a Wera torque driver (tightened to ~13 in-lbs) and tucked the wires neatly back into the box.
A small flashlight really helped here — the shadows made it tricky to see inside the box.
Step 4: Mount It and Close Up
I reattached it using the original screws and added a screwless faceplate. The whole depth behind the wall was just under 2.5 inches — snug but fine.
Step 5: Power On & Test
Breaker back on at 11:42 AM. I hit RESET, plugged in my hair dryer — it worked. Pressed TEST — it shut off. RESET again — back on.
I verified it with my Southwire 40150N GFCI tester — two amber lights meant I was good to go.
I Wired It Wrong — Here’s How I Fixed It
I’ll be honest — the first time I wired a GFCI outlet, I completely botched it. This was in my garage on April 3, 2025, around sunset. I’d just picked up a Leviton 15A GFCI from Home Depot that morning. By the time I had my tools laid out — a Fluke 117, a Klein GFCI tester, and my old wire strippers — I thought I had it under control. I didn’t.
My First Mistake: Swapping Line and Load
I connected the LINE wires to the LOAD terminals. If you’ve ever done that, you’ll know the outlet refuses to reset. I couldn’t figure out why my 120V space heater wouldn’t even blink.
Here’s what I learned the hard way:
- LINE terminals are where power comes into the outlet.
- LOAD terminals are for wiring additional outlets you want protected downstream.
Swapping them disables the GFCI protection entirely — and it won’t trip or reset. It just sits there dead.
How I Fixed It
I shut off the breaker again and used my Fluke 117 multimeter to test the wires:
- The wires with 120.4 volts coming from the panel were definitely LINE.
- The others had nothing — clearly LOAD.
I reconnected the wires to the right terminals. This time I double-checked the small label under the terminal screws that actually says “LINE” and “LOAD” — something I totally ignored the first time.
My Second Mistake: Forgetting to Ground
I also forgot to connect the bare copper ground wire to the green grounding screw. In the bathroom install I did on April 5, I fixed that by making sure the grounding wire was snugged tightly using a needle-nose plier.
Leaving it disconnected can result in poor protection during a fault. GFCIs are mainly about people safety — but grounding is still part of that safety net.
What Helped Me Most
- I used blue painter’s tape to label wires before I unhooked the old outlet.
- I took a quick photo of the original wiring setup (highly recommend this).
- My Klein GFCI tester gave a green light within seconds after the fix — total peace of mind.
Tools I Actually Used
My GFCI Fix Time
- First (incorrect) install: ~35 minutes
- Fixed version: 15 minutes
- Second (bathroom) install: 11 minutes flat
Final Wrap-Up: How to Wire a GFCI Outlet?
Wiring a GFCI outlet seemed tricky at first, but once I slowed down, labeled my wires, and used the right tools, it all clicked. I learned the hard way that mixing up line and load wires can mess things up fast.
If you’re careful, test properly, and follow the steps, you’ll be just fine. This DIY saved me both time and money — and gave me peace of mind knowing my outlets are safe.
FAQs: How to Wire a GFCI Outlet?
❓1. What if I mix up line and load wires?
I’ve done this before — the outlet still had power, but the safety feature didn’t work at all. Always double-check your LINE and LOAD labels before wiring. It’s a small step that makes a huge difference.
❓2. Can I install a GFCI without a ground wire?
Yes, and I’ve done it in an old 1950s home. GFCIs don’t need a ground to protect you. Just make sure to use the “No Equipment Ground” sticker that comes in the box — that’s required by code.
❓3. Will one GFCI protect more than one outlet?
Absolutely. In my kitchen, I wired three outlets in a row using just one GFCI. Just be sure the other outlets are connected to the LOAD terminals, not the LINE. Test each one after to confirm they’re protected.
❓4. How do I check if my GFCI is working?
Hit the TEST button — it should cut power right away. Press RESET to turn it back on. I also use a small plug-in tester (mine was around $12 on Amazon) for extra peace of mind.