A computer’s power supply is one of its most important components. If it fails, the computer will not work. In this PSU testing guide, I will tell you how to test computer power supply with multimeter in very short span of time. However, before starting any troubleshooting, you must understand the workings of the PSU.
What is a PSU or Computer Power Supply?
The PSU or power supply unit is responsible for providing power to every component of your computer. It converts the alternating current (AC) from your wall outlet into the direct current (DC) required by the components. The PSU also regulates the voltages going to different parts of the system. Some PSUs have a switch to change between 110 and 220 voltages.

7 Major Parts of Computer Power Supply:
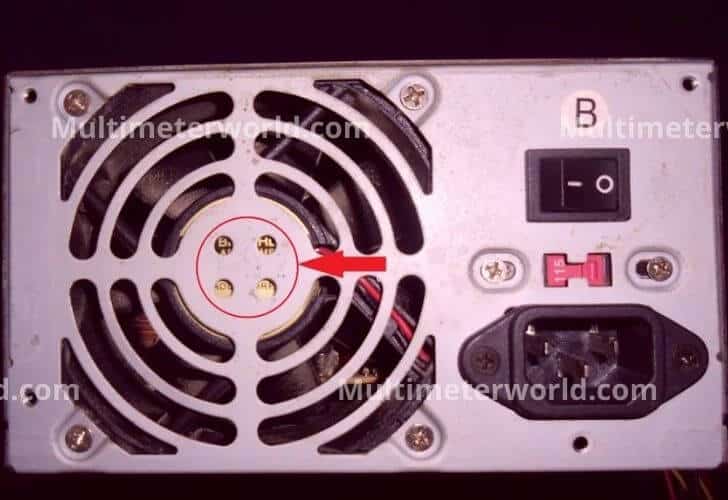
- AC INPUT: This is where you plug in the power cord from the wall outlet.
- POWER CORD: The power cord connects the PSU to the wall outlet.
- VOLTAGE SELECTOR SWITCH (not present in all PSUs): This switch is used to change between 110 and 220 voltages.
- POWER ON/OFF SWITCH: This switch is used to turn on and off the PSU.
- FAN: The fan helps to cool the computer power supply.
- ATX CONNECTOR: This connector is used to connect the PSU to the motherboard.
- PERIPHERAL CONNECTORS: These connectors are used to connect the PSU to peripherals such as hard drives, optical drives, and case fans.
Now that you know the basics of PSU let us move on to how you can test it.

Tools Required to test Computer power supply (PSU)
For testing the PSU, you will need the following tools
- Digital Multimeter
- Power Supply (PSU) Tester
- Screwdriver set (for opening the computer case)
- Insulated Gloves
How to test computer power supply with Multimeter?
Now that you know PSU basics let us move on to the testing guide. For this, you will need a digital multimeter. A multimeter is an instrument that can measure voltage, current, and resistance.
You have to measure voltages in the computer power supply, so it is better to have a digital multimeter that can measure DC voltages. If your PSU or computer power supply is found ok, but other accessories aren’t working, visit my power supply testing guide.
Analog multimeters are not very accurate in measuring DC voltages, so it is better to use a digital one. Another reason to use a digital multimeter is that it can store the readings in its memory, which will be helpful later on.
Step by Step guide for testing Computer Power Supply
Here I will tell you how to test PSU with multimeter in 10 simple steps.
- First, disconnect the PSU from the wall outlet and open the computer case.
- To begin testing the PSU, first, you need to open the computer case. For this, you will need a screwdriver set.
- Once you have opened the case, locate the PSU. Check thoroughly if there are any damaged wires or heated components, then your PSU is damaged and needs to be replaced.
- If there is no physical damage, turn on the power supply with a series lamp. So, if there is any short circuit, the current flows through the series lamp saving your PSU from further damage.
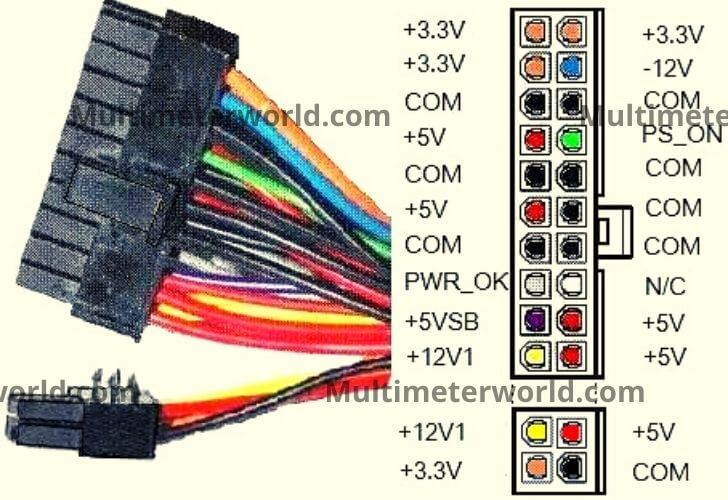
- Now check all the power supply pin-outs ranging from 1 to 24. (There are 12 pins on each side, as shown below-mentioned pic.
- Set your multimeter to DC Voltage.
- If you have an auto-ranging multimeter, then it’s good to go. Otherwise, you have to set the dial to 20V DC.
- Connect Black (Com) test lead to any of the black connectors and Red (Positive) test lead on each connector step by step.
- The voltage in each pin should be +12, -12, +3,-3,+5, and -5.
- If the voltages are too high or low than the rated voltage, your PSU needs to be replaced.

Some Important Tips While testing PSU
Hopefully, you have now understood how to test computer power supply with multimeter. But there are a few things you should know from a safety perspective. Beginners and professionals, both are equally prone to electrical shocks. So, it is better to follow some safety guidelines while testing PSU with a multimeter or any other equipment.
- First of all, make sure that you are wearing insulated gloves. This will protect your hands from electrical shocks.
- Another thing to keep in mind is that the PSU should be disconnected from the wall outlet and the motherboard.
- If you see any smoke or smell any burn, immediately disconnect the PSU and seek professional help.
- Do not open the PSU if it is damaged as there can be high voltages stored in its capacitors which can give you a severe electrical shock.
- After testing your computer power supply with a multimeter, if you find out that it is good, then plug it carefully as per the connection guide.
- Now, screw all the panels, connect your PSU to the wall outlet, and boot up your computer.
Final Verdict
The power supply or PSU is the most critical component of a computer. If it is damaged, it can damage other parts of the computer. That is why it is very important to test PSU before using it. Due to gaming and high-end software, the power requirements of computers have increased, resulting in an increased number of PSU failures.
In this blog post, I have told you how to test computer power supply with multimeter in 10 simple steps. You can easily follow them and save your computer as well as PSU from further damage. If you’re looking for a good quality multimeter, I have also made a list of the best multimeters for electronics work.
I hope this PSU testing guide was helpful and informative for you. Do let me know in the comments section below if you have any suggestions or queries.
Frequently Asked Questions
What are the signs of a failing power supply?
There are a few signs which indicate that your PSU is failing. These include random shutdowns, BSODs, freezes, and crashes. If you experience any of these problems, then it is better to test your PSU with a multimeter. Your power supply may also make a whining noise, which indicates that it is failing.
What are the consequences of using a damaged PSU?
If you use a damaged PSU, then it can damage other components of your computer like the motherboard, CPU, and graphics card. It can also cause data loss and corruption. That is why it is very important to test your computer power supply before time.
What if you connect the wrong power supply cables?
Connecting the wrong power supply cables can damage your computer and other components. That is why it is very important to check the connector guide before connecting the PSU. It would be best to ensure that the PSU is correctly grounded before plugging it into the wall outlet.
Why is my computer power supply fan making noise?
The PSU fan makes noise when it is not getting enough power. This can be due to several reasons like dust accumulation, wrong connection, or low-quality cables. You should clean the fan and ensure that all the wires are properly connected. Plus, you should also check if the PSU is getting enough power from the wall outlet.
Can I recycle PSU?
Yes, you can recycle your PSU. You can take it to a recycling center or recycle it at home. Recycling at home is not very difficult, and you can easily do it with the help of a few tools. A recycled computer power supply is used as a DC power source for multiple DIY or science projects.
How do you discharge a computer power supply?
You can discharge a computer power supply by shorting the green wire to any one of the black wires. This will release all the stored charge in the capacitors of your PSU. However, you should be very careful while doing this as there is a risk of electrical shock. Plus, you should also make sure that the PSU is properly grounded before starting the process.
What is the warranty on a PSU?
The warranty on a PSU depends on the manufacturer. Some manufacturers offer a one-year warranty, while others offer a two-year or even a three-year warranty. You should check the warranty period before buying a PSU. Plus, you should also make sure that the PSU has all the necessary safety features.
