

It is good to know how to trace a wire with a multimeter. To trace a wire with a multimeter, set the multimeter to continuity testing mode. Attach one probe to one end of the wire and the other to the opposite. If continuity indicates a continuous path, you have successfully traced the wire. This method helps identify the path of a wire and locate any breaks or faults along the way.
How to Trace a Wire with a Multimeter?
There are various steps to trace a wire; here’s a step-by-step guide on how to trace a wire with a multimeter:
A Quick Look
Step 1: Gather the necessary tools
Before you begin, ensure you have handy tools: a multimeter (preferably with a continuity testing feature), a pair of alligator clips or probe leads, and a pen and paper to take notes.

NOCO Boost Plus GB40
⭐ 4.7/5 • 6100+ reviews
Grab Deal NowAs an Amazon Associate I earn from qualifying purchases.
Step 2: Set up the multimeter
Start by setting up your multimeter. Select the continuity testing mode if it has a dial or a menu. This mode allows you to check if a wire is continuous or broken. Ensure the multimeter is properly calibrated and the probes are connected securely.
Step 3: Disconnect power
If the wire you plan to trace is part of an electrical circuit, turning off the power source and unplugging any connected devices is crucial. It will prevent any potential accidents or electrical shocks.
Step 4: Identify the wire
Take a close look at the wire you want to trace. Identify the specific wire you’re interested in tracing if multiple wires run together.
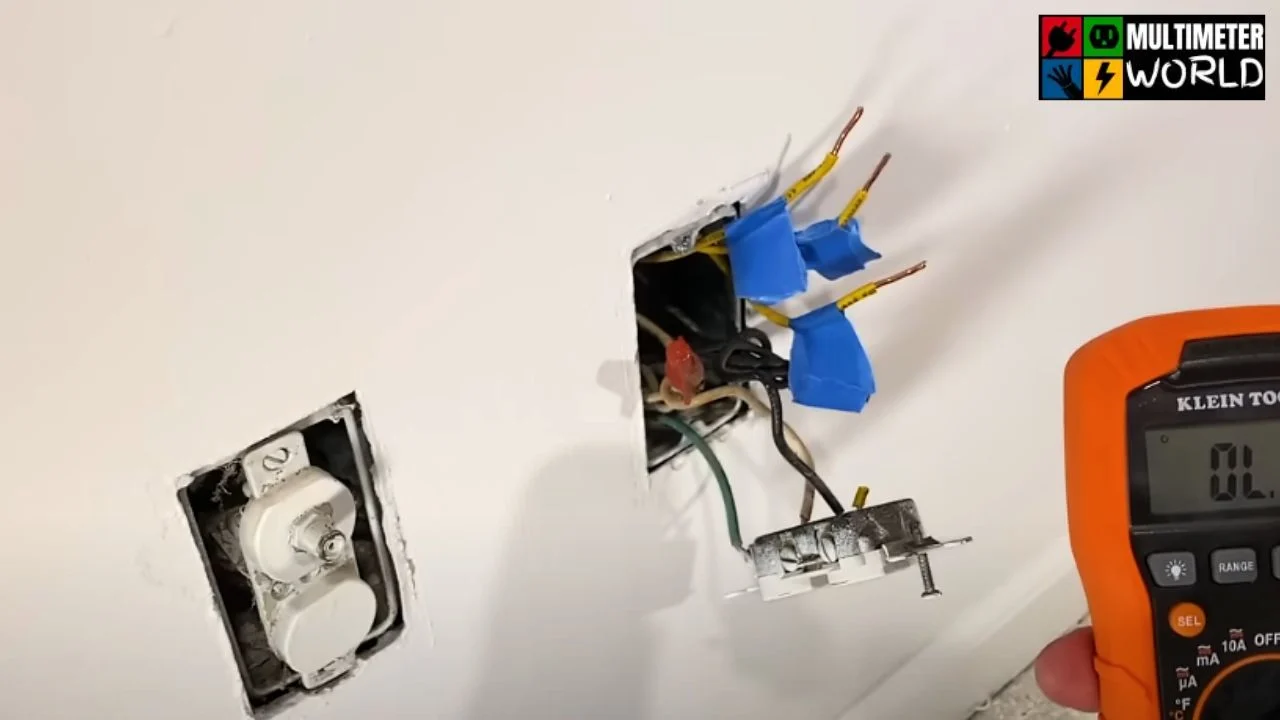
Step 5: Continuity test
Attach one probe lead of the multimeter to one end of the wire you want to trace. Using alligator clips or attaching the probe lead securely is best to ensure a good connection.
Then, touch the other probe lead to the other end of the wire. If the wire is continuous and intact, the multimeter should emit a beep or show a continuity reading on display.
Step 6: Mark the wire
Once you have confirmed continuity, mark the wire you tested using a small piece of tape, a label, or by making a note on your paper. It will help you keep track of the wire you have already tested, especially if multiple wires are involved.
Step 7: Continue tracing
Move along the wire and test for continuity at various points. If the wire is accessible, you can test it at regular intervals.

Step 8: Follow the wire path
As you test for continuity, follow the wire’s path through the system or circuit. If you come across junction points where the wire splits or connects to other wires, test each branch individually to determine which one you want to trace further.
Step 9: Note any abnormalities
While tracing the wire, pay attention to any abnormalities you encounter. It includes breaks in continuity, unexpected readings, or variations in the wire’s path. These abnormalities may indicate a faulty connection, a damaged wire, or a problem with the circuit.
Step 10: Verify the traced wire
Once you have traced the wire from start to end, verify it is the wire you were looking for. If available, compare its location and path with your initial expectations or wiring diagrams. It will ensure that you have successfully traced the correct wire.
Step 11: Take necessary actions
Depending on the purpose of your wire tracing, you can take appropriate actions based on your findings. If you were tracing a wire to diagnose a problem, you can now focus on repairing or replacing the faulty wire.
If you were tracing a wire for a specific purpose, such as installing a new component, you could proceed with the necessary connections or modifications.
Step 12: Document your findings
Note down the wire’s identification, any abnormalities, and your actions. This documentation will be helpful for future reference or troubleshooting.
Remember to always prioritize safety when working with electrical systems. Hope so, now you feel good to know how to trace a wire with a multimeter.
Signs of a Faulty Wire
Signs of a faulty wire can vary depending on the specific electrical system or application, but here are some common indicators to look out for:
1. Frequent Circuit Breaker Tripping
If you notice that the circuit breaker for a specific circuit frequently trips, it could be a sign of a faulty wire. Faulty or damaged wires can cause an excessive current flow, leading to an overload and triggering the circuit breaker to trip as a safety measure.
2. Flickering or Dimming Lights
Flickering or dimming lights can indicate a faulty wire. A poor connection or a damaged wire in the circuit supplying power to the lights can result in inconsistent electrical flow, leading to flickering or dimming.

3. Discolored Outlets or Switches
If you observe discolored outlets or switches, such as blackened or charred areas, it may indicate a faulty wire. Overheating caused by loose connections or damaged wires can lead to discoloration.
4. Burning Odor
A burning odor is a significant warning sign of a faulty wire. If you detect a distinct smell of burning plastic or insulation, it suggests that the wire is overheating or has already started melting.
5. Sparking or Electrical Arcs
Sparking or electrical arcs are clear indicators of a faulty wire. When wires are frayed, damaged, or improperly connected, they can produce sparks or arcs when electrical current passes through them. These sparks are not only dangerous but can also ignite nearby flammable materials.
6. Warm or Hot Outlets
If you notice that an outlet feels warm or hot to the touch, it could be a sign of a faulty wire. The heat may result from poor connections or excessive electrical resistance, indicating an underlying issue that needs to be addressed to prevent potential electrical hazards.
7. Tripped Ground Fault Circuit Interrupter (GFCI)
A GFCI is a safety device that detects ground faults and protects against electrical shock. If the GFCI repeatedly trips when an appliance or device is connected to an outlet, it could indicate a faulty wire.
8. Sporadic or Non-functional Outlets or Switches
When outlets or switches work intermittently or stop, it often points to a faulty wire. Loose connections, damaged wires, or worn-out components can result in inconsistent electrical flow or complete loss of power.
9. Electrical Shocks
Experiencing electrical shocks when plugging in or touching electrical devices clearly indicates a faulty wire. Faulty wiring can expose you to live currents, posing a serious risk of electrical shock. If you encounter electrical shocks, it’s crucial to have the wiring inspected and repaired immediately.
10. Rodent Infestation or Physical Damage
Rodents can chew through electrical wires, causing damage and creating potential hazards. Look for signs of rodent infestation, such as droppings or gnawed cables. Physical damage to wires, such as cuts, abrasions, or visible breakage, can also be signs of a faulty wire.

11. Excessive Energy Bills
If your energy bills suddenly increase without a reasonable explanation, it could be due to faulty wiring. Damaged or faulty wires can cause energy wastage through leaks or inefficiencies, leading to higher electricity consumption and, subsequently, higher bills.
12. Circuit Overheating and Melting Insulation
When wires are overloaded or experiencing excessive resistance, they can generate heat. This can cause the insulation around the wires to melt or degrade, exposing the live wire. Overheating and melting insulation are severe signs of a faulty wire requiring immediate attention to prevent fire hazards.


FAQs
Can a multimeter find wires in a wall?
A multimeter, a versatile electrical testing tool, is not specifically designed to locate wires hidden inside walls. Multimeters primarily measure electrical properties such as voltage, current, and resistance. While they can help diagnose electrical issues and test live wires, they cannot directly detect or locate wires within wall cavities.
How do I find lost wires?
When faced with the challenge of finding lost or hidden wires, you can try a few methods. First, visually trace the wire’s path if it is accessible. Look for visible indicators like conduit, cable runs, or electrical boxes. You can use a cable tracker or wire tracer if the wire is still elusive. These devices send a signal through the wire, allowing you to track its path and identify its location.
What do electricians use to trace wires?
Electricians employ various tools and equipment to trace wires accurately. One commonly used tool is a cable tracker or wire tracer. The transmitter is connected to the wire or cable being traced, emitting a specific signal onto the wire. The electrician then uses the receiver to detect and follow the signal, allowing them to trace the wire’s path, even if it is hidden or bundled with other wires.
Conclusion
In conclusion, while a multimeter is a valuable tool for electrical measurements, it is not typically used for wire tracing. Tracing wires involves locating and following the physical path of a wire, which cannot be achieved directly with a multimeter.
Instead, electricians employ specialized tools like cable trackers, wire tracers, tone generators, and probes to accurately trace wires through walls, conduits, or bundles.
These tools provide signals or tones that allow electricians to identify and track wires effectively, simplifying troubleshooting and installation processes. We hope, now you know the answer to your question, how to trace a wire with a multimeter.